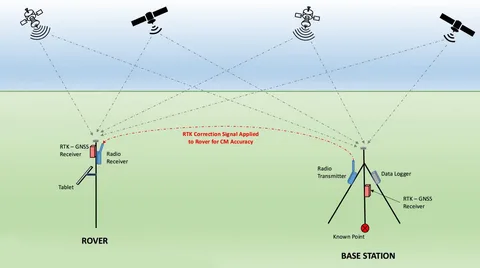
Real-Time Kinematic (RTK) GPS systems have revolutionized precision positioning in fields like surveying, agriculture, construction, and drone navigation. These systems offer centimeter-level accuracy by using correction data from a base station to enhance the positional information received by a rover or mobile GPS unit.
This Beginner’s Guide to Setting Up an rtk gps System will walk you through the essential components, setup steps, and tips to get started successfully.
What is an RTK GPS System?
An RTK GPS system consists of two main components:
- Base Station: A fixed GPS receiver that broadcasts correction signals.
- Rover: A mobile GPS receiver that receives signals from satellites and the base station to calculate precise positions.
By correcting errors caused by atmospheric interference and satellite geometry, RTK systems provide much higher accuracy than standalone GPS units.
Equipment You Need
Before starting the setup, ensure you have the following equipment:
- RTK-capable GPS base station
- RTK rover or mobile GPS unit
- GNSS antenna
- Radio link or cellular modem (for data transmission)
- RTK-compatible software or app
Some systems come as an all-in-one kit, making them ideal for beginners.
Step-by-Step: Setting Up Your RTK GPS System
1. Choose the Right Location for the Base Station
Place the base station in a location with:
- A clear view of the sky
- No interference from trees, buildings, or metal objects
- A stable, known reference point (if absolute positioning is needed)
2. Connect and Power Up
Set up the antenna and power supply. Many modern base stations are battery-powered or solar-compatible for field use.
3. Configure the Base Station
Use the provided software or device interface to:
- Select satellite constellations (GPS, GLONASS, Galileo, etc.)
- Set the base station coordinates (either known or average position)
- Set up data transmission via UHF/VHF radio or mobile network
4. Set Up the Rover
Once the base is transmitting corrections:
- Power on the rover
- Connect to the base station via the selected communication method
- Ensure it’s receiving correction data (often shown in the software interface)
5. Test and Calibrate
Check accuracy by comparing known coordinates or performing a small test survey. Calibrate if necessary, especially if working in a local coordinate system.
Common Issues and Troubleshooting
- Loss of correction signal: Check radio signal strength or internet connectivity.
- Inaccurate positioning: Ensure the base station is set up correctly and not obstructed.
- Hardware errors: Check for firmware updates or contact technical support.
Tips for Beginners
- Start with an RTK system that offers good support and documentation.
- Practice in a familiar, open area before heading into complex terrains.
- Record all settings and configurations for future reference.
Conclusion
Setting up an RTK GPS system might seem intimidating at first, but with the right guidance, it’s a manageable and rewarding process. This Beginner’s Guide to Setting Up an RTK GPS System covered the essential steps and tips to get you started on your journey toward high-precision GPS usage. Whether you’re mapping, surveying, or flying drones, the benefits of RTK are well worth the effort.


